Part2 - thread Connect ZBT-1(docker openthread/otbr)
This guide installs a firmware which supports only Thread! I’m attempting to setup the Connect ZBT-1 OTBR docker container as I am running HA docker on rpi 5.
I have 2 border routers
1x homepod mini hub
1x Connect ZBT-1 OTBR on home assistent
Table of Contents
- Preparation
- Thread Border Router and Thread 网络
- Quick Start
- How it Works
- How They Work Together
- Step 1.flasher firmware - Install dedicated Thread Firmware
- Step 2.Verify Hardware - ensure your debian 12 OS recognizes Connect ZBT-1
- Step 3.run OTBR on the pi using docker
- Step 4.add the Open Thread Border Router service to your Home Assistant instance-Open Thread Border Router Integration
- Step 5 . - Thread integration
- Step 6.Make Preferred Network
- Step 7.Add Thread Device
- Share Credentials
- Add Thread Device to home assistant using Android HomeAssistant Companion app
- Add Thread Device to home assistant using iOS HomeAssistant Companion app
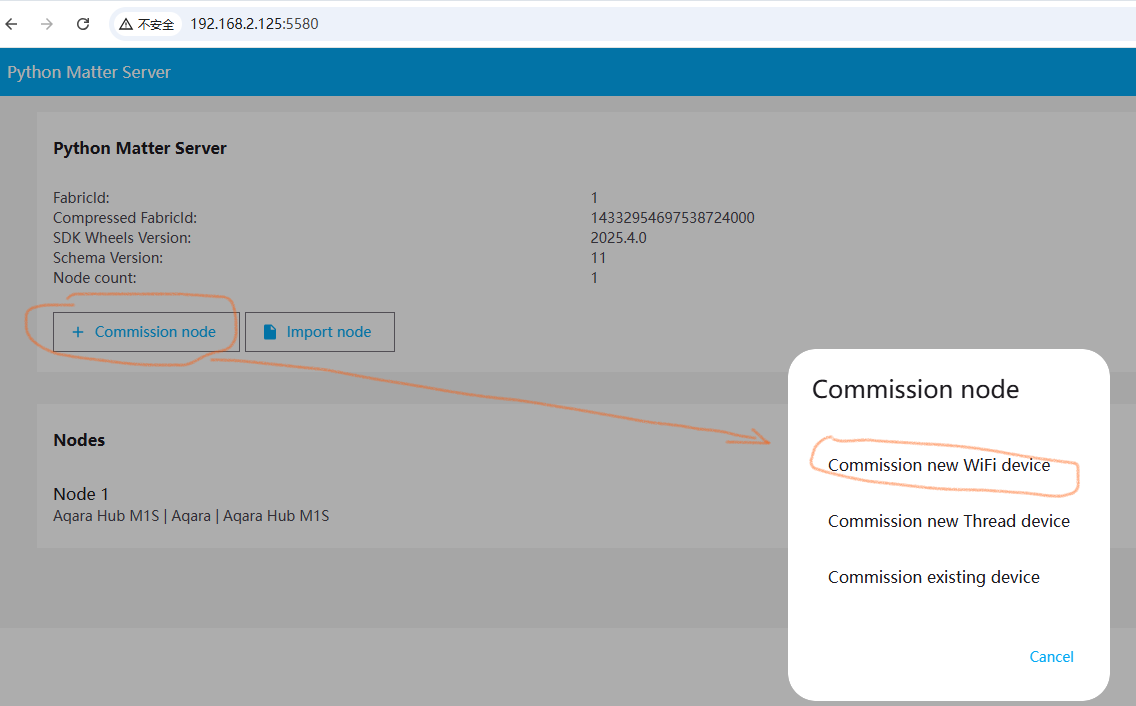
- Add matter device to docker matter server via matter server web ui
Adding Thread devices requires access to your active Thread network credentials. so you have to create a Thread network running inside Home Assistant.
To use the Home Assistant Connect ZBT-1 with Thread on a Raspberry Pi, you'll need to enable Thread support on the ZBT-1 and then configure the Thread integration in Home Assistant.
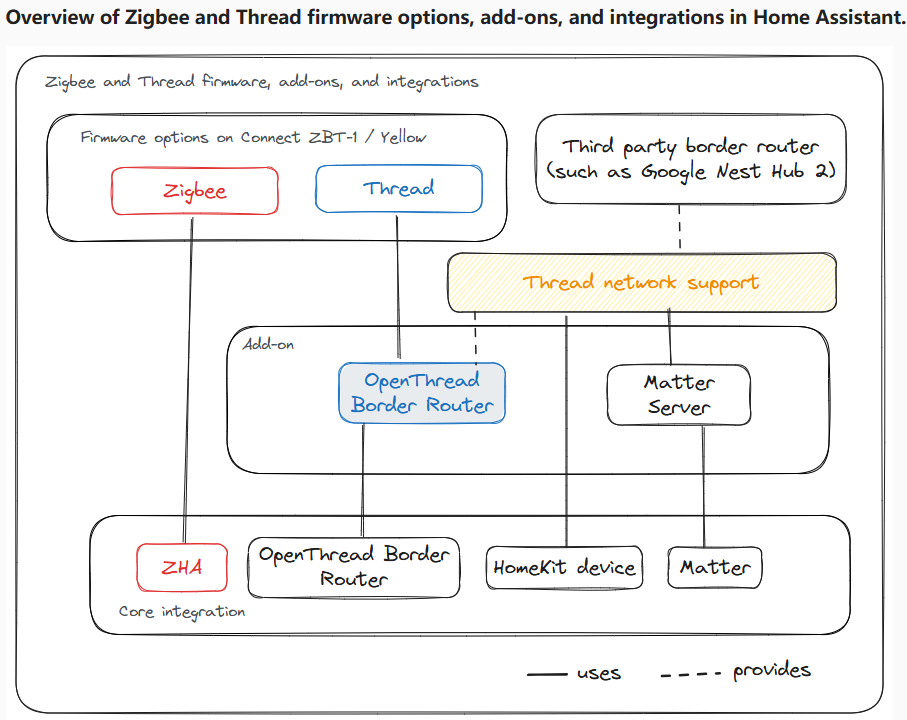
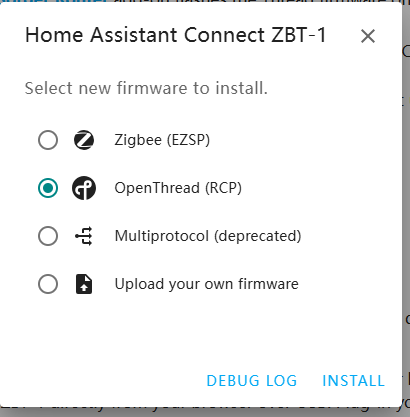
Options firmware for OpenTread Border Router.
There is ZigBee only firmware, there is multiprotocol firmware (ZigBee and Thread) and there is Thread only firmware.
You need Thread to be an OTBR.
First, plug the ZBT-1 into the extension cable and then into your Raspberry Pi. Debian OS should automatically detect a ZBT-1.
Then, install dedicated Thread Firmware on the ZBT-1.
Finally, configure the Thread integration to ensure the Home Assistant network is the preferred network and share the Thread credentials with your mobile app
https://connectzbt1.home-assistant.io/firmware-update/
Preparation
Home Assistant Docker installation (AMD64 or ARM64)
Bluetooth dongle
Thread dongle :Home Assistant’s Connect ZBT-1
Thread Border Router and Thread 网络

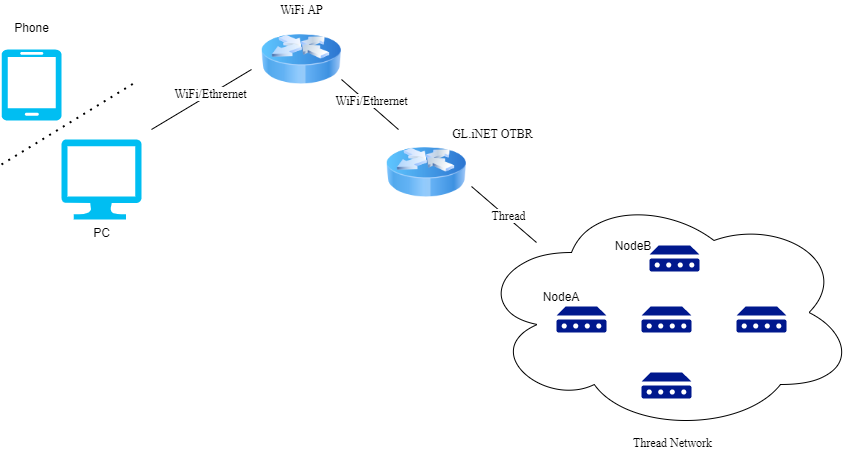
Thread Border Router
A border router is needed to bridge a Thread network to wifi/Ethernet.
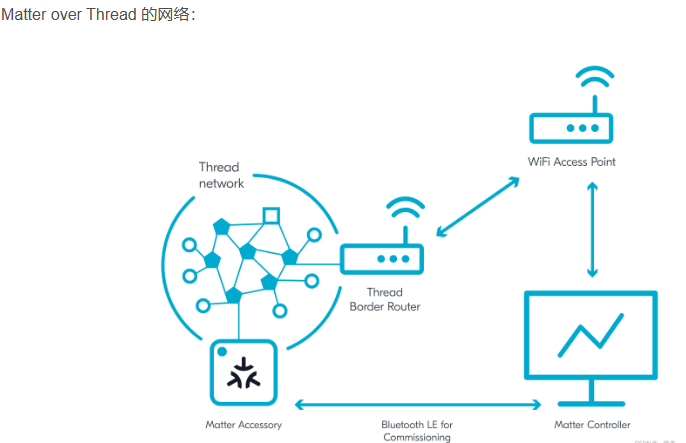
Thread Border Router 将 Thread 网络连接到其他基于 IP 的网络,例如 Wi-Fi 或以太网。Thread 网络要求通过边界路由器连接到其他网络.
This border router is a form of a normal IPv6 router.
Thread 边界路由器负责在 Wi-Fi 和 Thread 网络之间转发 IP 帧
Thread 网络中的设备无法直接与 Wi-Fi 或以太网设备通信。为了使 Thread 设备与其他网络中的设备互联,需要在 Matter 的拓扑结构中增加一个特殊设备:Thread 边界路由器。
The Thread Border Router needs a 15.4 Radio Co-Processor (RCP) in order to create and interact with the Thread network.
matter over thread in home assistant
Quick Start
To set up a Thread Router in Home Assistant Docker, follow these steps:
Install dedicated Thread Firmware on Connect ZBT-1
Install the Open Thread Border Router, Thread, and Matter integrations in your Home Assistant instance.
add the Open Thread Border Router service to your Home Assistant instance via otbr integraion
Add your border router container to the Open Thread Border Router integration.
Configure the Thread integration to create a thread network.
Assign the border router to the Home Assistant thread network.
Use the Matter integration to connect to the matter container.
You can add matter devices using the Home Assistant app
How it Works
Thread integration:
Thread integration in Home Assistant allows devices that communicate using the Thread protocol to communication between Thread-enabled devices and Home Assistant.
To start using Thread with your Home Assistant application, you would need to install the Thread integration, which acts as the interface between Thread and your Home Assistant.
1. This integration allows Home Assistant to create a new Thread network, manage its credentials.
2. In essence, while the Thread protocol is a creation of the Thread Group and its open-source implementation (OpenThread) is from Google, Home Assistant (through its integrations and the OpenThread Border Router running on devices like the ZBT-1) creates and manages the specific Thread network that your devices will join within your smart home ecosystem.
be used to connect an existing thread network.Home Assistant itself doesn’t create a Thread network — it connects to an existing Thread Border Router on your network.
OpenThread Border Router integration:The Open Thread Border Router integration allows Home Assistant to acess Open Thread Border Router.
be used to Connect Home Assistant to an Existing OpenThread Border Router.add the Open Thread Border Router service to your Home Assistant instance.
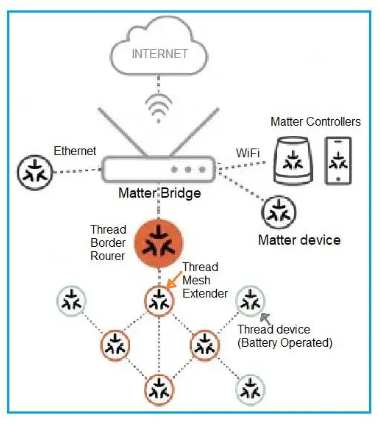
An OpenThread Border Router connects a Thread network to other IP-based networks, such as Wi-Fi or Ethernet in Home Assistant, Home Assistant can act as an OpenThread Border Router. This integration is allowing Thread devices to communicate with Home Assistant.
http://<YOUR IP ADDRESS>:8081
Matter integration:
1. Matter integration in Home Assistant allows you to add and control Matter-certified devices, through the Home Assistant interface. Matter can operate over various network technologies, including Thread and Wi-Fi.
2. Matter server works over Thread and/or Wi-Fi/Ethernet.
3. Matter integration in HA use Thread integration if the device is Thread-based.
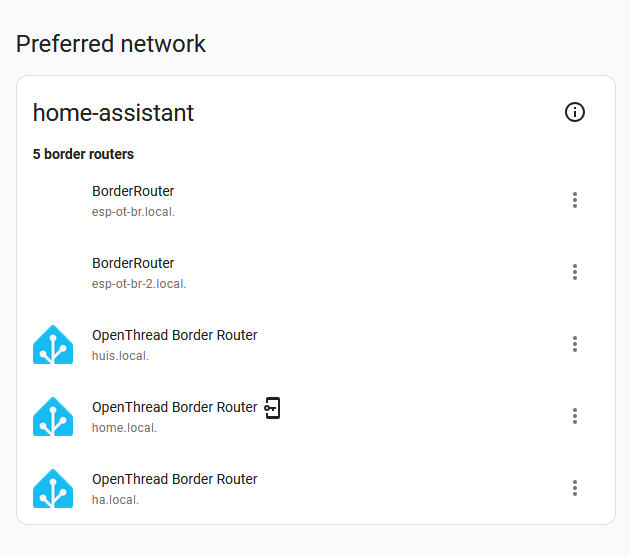
Preferred Network:
Make the Thread network preferred be used to Connect Home Assistant to an Existing Thread Network.
In the context of Home Assistant's Thread integration, the "Preferred Network" setting designates a specific Thread network as the default for adding new Thread-based devices. This helps ensure that new devices are commissioned onto the intended Thread network when multiple border routers are present.
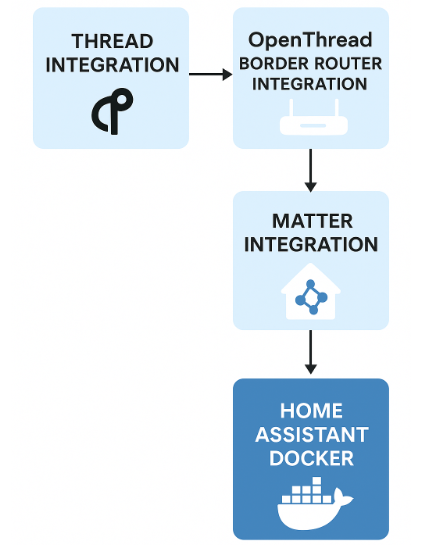
How They Work Together
Think of it like layers:
Home Assistant in Docker — the environment.
Thread Integration — the network layer for Matter-over-Thread devices.
OpenThread Border Router (OTBR) Docker — the physical bridge that lets Thread devices talk to via ipv6.This step creates a bare-bones HTTP service that exposes two endpoints .
OpenThread Border Router (OTBR) Integration — the physical bridge that lets Thread devices talk to HA.
Matter Integration — Matter integration in HA use Thread integration when the device is Thread-based.
Setup:
You run Home Assistant in Docker.
You have an OTBR running on a Raspberry Pi with a radio stick.
HA uses Thread integration to join the OTBR’s Thread network.
You add a Matter-over-Thread sensor — it appears in HA via the Matter integration.
Share Credentials detail
Add Thread Device deail
Adding Thread devices requires access to your active Thread network credentials. so you have to create a Thread network running inside Home Assistant.
Before you can add Matter-based Thread devices, your phone needs to know the credentials of your newly created Thread network.
Finally, configure the Thread integration to ensure the Home Assistant network is the preferred network and share the Thread credentials with your mobile app
detail:https://blog.matterxiaomi.com/blog/matter-gateway-part-2/#mcetoc_1ioh0ffhm3
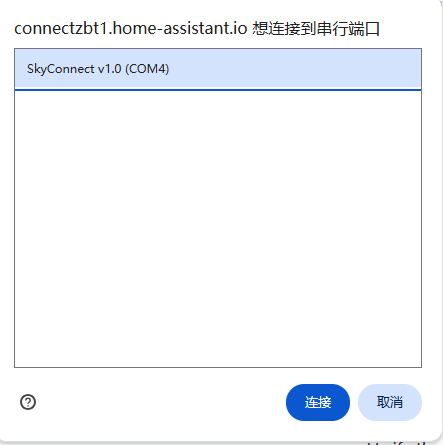
Step 1.flasher firmware - Install dedicated Thread Firmware
Home Assistant Connect ZBT-1 Firmware
Plug the Home Assistant Connect ZBT-1 via USB.
go to:
https://connectzbt1.home-assistant.io/firmware-update/
https://home-assistant-skyconnect.netlify.app/firmware-update/
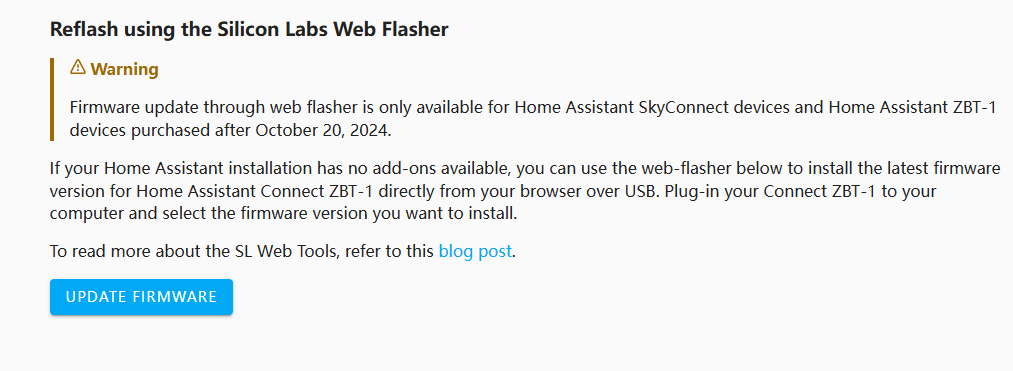

Note
The running firmware could not be detected.
Make sure the USB port works and if you are using a USB extension cable, make sure the cable can transfer data. Unplug the Home Assistant Connect ZBT-1 and plug it back in to reset and try again.
Firmware update through web flasher is only available for Home Assistant SkyConnect devices and Home Assistant ZBT-1 devices purchased after October 20, 2024.
Step 2.Verify Hardware - ensure your debian 12 OS recognizes Connect ZBT-1
ensure your debian 12 OS recognizes it
Ensure the RCP ( Connect ZBT-1) is correctly connected to your host system.
Used the command to determine the USB device:
# lsusb
Bus 001 Device 004: ID 10c4:ea60 Silicon Labs CP210x UART Bridge

ls /dev/tty*
/dev/ttyUSB0

ls -l /dev/serial/by-id/
usb-Nabu_Casa_SkyConnect_v1.0_c23df65189a3e811ba1d91603b0549ec-if00-port0 -> ../../ttyUSB0
Step 3.run OTBR on the pi using docker
lsusb
ls /dev/tty*
ls -l /dev/serial/by-id/
docker run --sysctl "net.ipv6.conf.all.disable_ipv6=0 net.ipv4.conf.all.forwarding=1 net.ipv6.conf.all.forwarding=1" -p 8080:80 --dns=127.0.0.1 -it --volume /dev/pts/7:/dev/ttyUSB0 --privileged openthread/otbrFollowing the OTBR install guide from https://openthread.io/guides/border-router/docker/run
this is my docker compose (i created an external macvlan for the network)
services:
  otbr:
    container_name: otbr
    image: "openthread/otbr:latest"
    privileged: true
    restart: unless-stopped
    networks:
      - otbr_mvl
    sysctls:
      net.ipv6.conf.all.disable_ipv6: 0
      net.ipv4.conf.all.forwarding: 1
      net.ipv6.conf.all.forwarding: 1
      net.ipv6.conf.all.accept_ra_rt_info_max_plen: 64
      net.ipv6.conf.all.accept_ra: 2
    command: --radio-url spinel+hdlc+uart:///dev/ttyUSB1?uart-baudrate=460800
    devices:
      - /dev/ttyUSB1
    dns: 127.0.0.1

networks:
   otbr_mvl:
     external: true
https://github.com/orgs/openthread/discussions/10311#discussioncomment-9631786
Note
Set Baudrate to 460800
Set port 8080 for the Web UI
Set 8081 for the REST API.
You may need to pass through USB OTBR devices into the Docker container.
source:https://www.matteralpha.com/how-to/how-to-use-home-assistant-to-add-matter-devices-without-phone
Ensure the RCP ( Connect ZBT-1) is accessible by the OTBR container.Verify the radio-url in your OTBR configuration matches the correct serial port and baud rate of your RCP.
IPv6 configuration (for example, IPv6 routing needs to be enabled)
output
success, you should have output similar to this:
WARNING: Localhost DNS setting (--dns=127.0.0.1) may fail in containers.
RADIO_URL: spinel+hdlc+uart:///dev/ttyUSB0
TUN_INTERFACE_NAME: wpan0
NAT64_PREFIX: 64:ff9b::/96
AUTO_PREFIX_ROUTE: true
AUTO_PREFIX_SLAAC: true
Current platform is ubuntu
* Applying /etc/sysctl.d/10-console-messages.conf ...
kernel.printk = 4 4 1 7
* Applying /etc/sysctl.d/10-ipv6-privacy.conf ...
net.ipv6.conf.all.use_tempaddr = 2
net.ipv6.conf.default.use_tempaddr = 2
* Applying /etc/sysctl.d/10-kernel-hardening.conf ...
kernel.kptr_restrict = 1
* Applying /etc/sysctl.d/10-link-restrictions.conf ...
fs.protected_hardlinks = 1
fs.protected_symlinks = 1
* Applying /etc/sysctl.d/10-magic-sysrq.conf ...
kernel.sysrq = 176
* Applying /etc/sysctl.d/10-network-security.conf ...
net.ipv4.conf.default.rp_filter = 1
net.ipv4.conf.all.rp_filter = 1
net.ipv4.tcp_syncookies = 1
* Applying /etc/sysctl.d/10-ptrace.conf ...
kernel.yama.ptrace_scope = 1
* Applying /etc/sysctl.d/10-zeropage.conf ...
vm.mmap_min_addr = 65536
* Applying /etc/sysctl.d/60-otbr-ip-forward.conf ...
net.ipv6.conf.all.forwarding = 1
net.ipv4.ip_forward = 1
* Applying /etc/sysctl.conf ...
 * Starting userspace NAT64 tayga             [ OK ]
/usr/sbin/service
 * Starting domain name service... bind9      [ OK ]
/usr/sbin/service
 * dbus is not running
 * Starting system message bus dbus           [ OK ]
   ...fail!
otWeb[155]: border router web started on wpan0
otbr-agent[224]: Thread interface wpan0
otbr-agent[224]: Thread is down
otbr-agent[224]: Check if Thread is up: OK
otbr-agent[224]: Stop publishing service
otbr-agent[224]: PSKc is not initialized
otbr-agent[224]: Check if PSKc is initialized: OK
otbr-agent[224]: Initialize OpenThread Border Router Agent: OK
otbr-agent[224]: Border router agent started.
In the context of Dockerized OpenThread Border Router (OTBR), the "Available Thread Networks" are the Thread networks that the OTBR instance is able to detect and interact with. These networks originate from physical Thread devices (like OpenThread Command Line Interface (CLI) devices, or other Thread-enabled devices) that are within the radio range of the Radio Co-Processor (RCP) connected to the OTBR.
Specifically, the OTBR utilizes the RCP to scan for and discover existing Thread networks. The information about these discovered networks, including their network name, PAN ID, extended PAN ID, and other operational dataset parameters, is then made available through the OTBR's interfaces, such as its web Graphical User Interface (GUI) or command-line tools like ot-ctl.
Therefore, the "Available Thread Networks" are not generated within the Docker container itself, but rather represent the real-world Thread networks that the OTBR, through its connected RCP, is observing in its environment.
1. Web GUI
http://192.168.2.125:8080/
2. Command-line ot-ctl
docker exec -it otbr /bin/bash
sudo ot-ctl
>state
output
~~~
# ot-ctl
>state
leader
Done
> dataset active -x
0e080000000000010000000300000f**30c0402a0f7f8
Done
>
~~~
Step 4.add the Open Thread Border Router service to your Home Assistant instance-Open Thread Border Router Integration
Tadd the Open Thread Border Router service to your Home Assistant instance.To
https://www.home-assistant.io/integrations/otbr
Autodiscover Thread after enabling the OTBR integration http://localhost:8081
Step 5 . - Thread integration
Note
Thread integration be used to create thread network, border router must be assigned to the homeassistant thread network
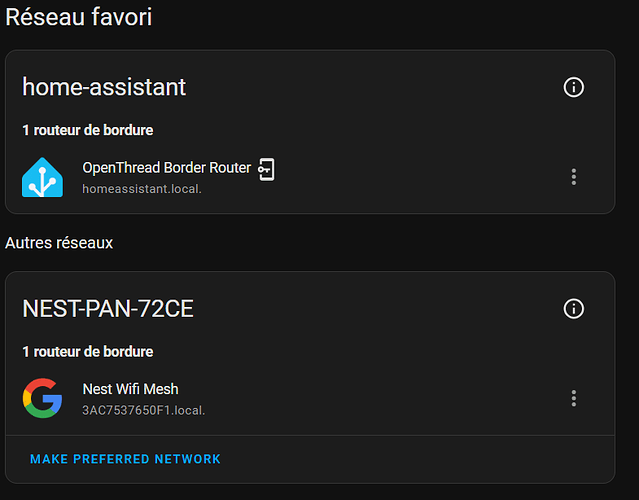
Step 6.Make Preferred Network
Verify that the Home Assistant logo appears under "Preferred network,"
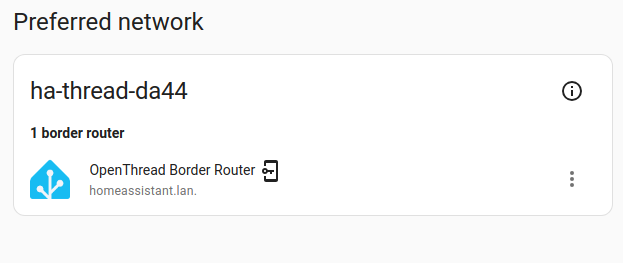
Select "Make preferred network" to mark this new home-assistant network as preferred
Matter-Over-Thread-Preferred Network-1
Step 7.Add Thread Device
Share Credentials
In the pop-up, find the Active dataset TLVs field and copy the long string — this is your Thread network credential.
1. syncing Thread credentials to Android from the Thread integration page
2.Before you can add Matter-based Thread devices, your phone needs to know the credentials of your newly created Thread network.
3.To share the credentials with your Android phone, open the Home Assistant Companion app.
In the Companion app, go to Settings > Companion app > Troubleshooting, then select Sync Thread credentials.
Share the Thread network credentials with your mobile app (e.g., Android or iOS) to allow it to communicate with the ZBT-1, according to Home Assistant. This is done through the Home Assistant Companion app by going to Settings > Companion app > Troubleshooting and then selecting "Sync Thread credentials
Add Thread Device to home assistant using Android HomeAssistant Companion app
Adding Thread devices requires access to your active Thread network credentials.
Sync Thread Credentials from Home Assistant to your phone
Update Thread network credentials from Home Assistant to your phone provide to matter commissioning process.
Open Android Companion APP > Settings > Companion app > Troubleshooting > Sync Thread credentials.
If you get a "Added network from Home Assistant to this device", then you are good to go.
Otherwise, you will need to clear all the data of Google Play Services then try again.
1.Adding Thread devices requires access to your active Thread network credentials. If you have a Thread network running inside Home Assistant, the process is much easier.
2.Before you can add Matter-based Thread devices, your phone needs to know the credentials of your newly created Thread network.
3.To share the credentials with your Android phone, open the Home Assistant Companion app.
In the Companion app, go to Settings > Companion app > Troubleshooting, then select Sync Thread credentials.
Follow the instructions on screen.
Result: You will see a confirmation stating that Thread credentials from Home Assistant have been added to this device.
To add Matter-based Thread devices, follow the steps on Adding a matter device to Home Assistant
Note
1.The Thread credentials are stored as part of the Google Play services.
2.Sometimes the Google Play services refuse to remove the old credentials.
3.Commission End Devices
Before you start commission end devices in Home Assistant app, you need to install Google Home app in Play Store, it is recommended by Home Assistant developers and you'll not able to pair Matter over Thread devices without installed Google Home app.
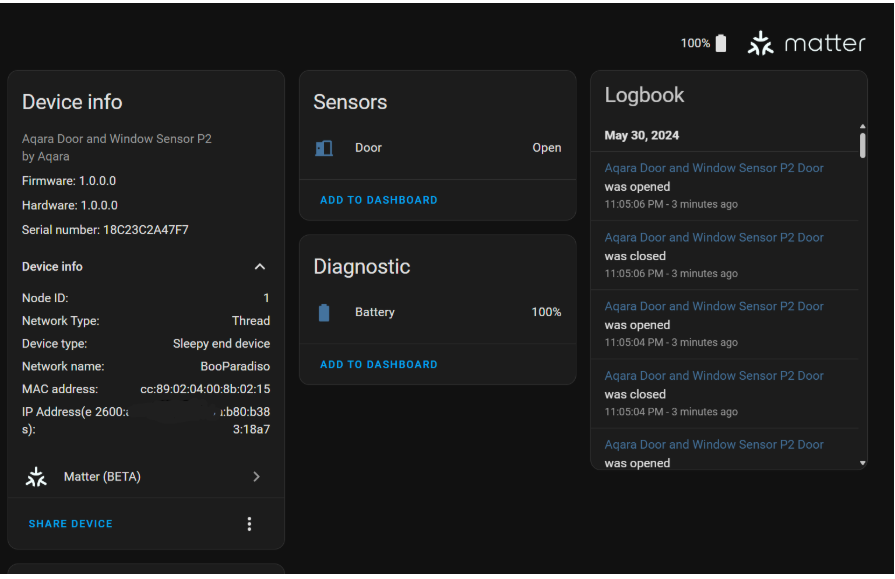
To commission your device, open the Home Assistant app on your smartphone, go to Home Assistant > Settings > Devices & Services, in the lower tabs bar, go to Devices and tap on Add Device, tap on Add Matter device.
After you turn the End Devices in Commission mode, scan the Matter QR code on the End Devices.
Add Thread Device to home assistant using iOS HomeAssistant Companion app
Sync Thread Credentials from Home Assistant to your phone
To share credentials with your iPhone, open the Home Assistant Companion app. Go to Settings > Devices & Services , select Thread integration ,Select Configure under Services . At the bottom of the preferred network area, select Send credentials to phone .
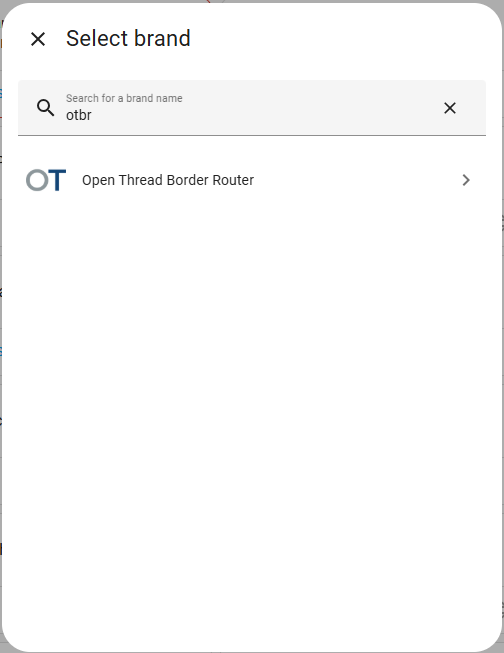
Add matter device to docker matter server via matter server web ui
https://blog.matterxiaomi.com/blog/matter-gateway-part-7/
Useful links
https://connectzbt1.home-assistant.io/procedures/enable-thread/
https://www.matteralpha.com/how-to/how-to-use-home-assistant-to-add-matter-devices-without-phone
Comments
Comments are closed