How to Install and configure eclipse Mosquttio MQTT broker Docker Container for home assistant on Raspberry Pi 5
Install Mosquttio MQTT broker on Raspberry Pi 5
Table of Contents
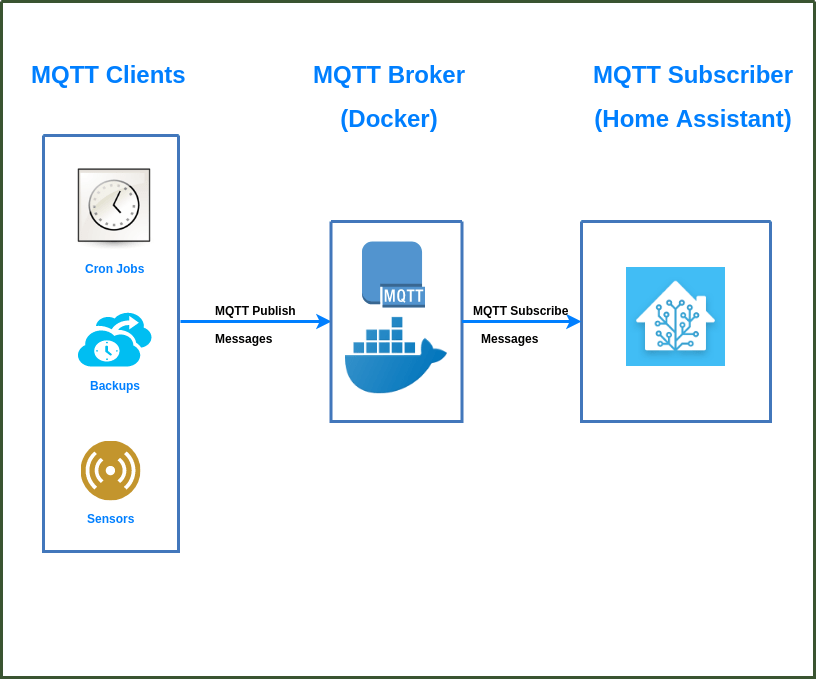
Intro
Install Mosquttio MQTT broker on Raspberry Pi 5.
Install Mosquttio MQTT broker
OS:Debian GNU/Linux 12 (bookworm)
lsb_release -aoutput
No LSB modules are available.
Distributor ID:	Debian
Description:	Debian GNU/Linux 12 (bookworm)
Release:	12
Codename:	bookworm
Docker-compose
create a file named with docker-compose.yaml.
/datadocker/mosquitto/docker-compose.yaml
services:

  mosquitto:
    container_name: mosquitto
    image: eclipse-mosquitto
    restart: unless-stopped
    ports:
      - "1883:1883/tcp"
    environment:
      - TZ=Europe/Brussels
    volumes:
      - /datadocker/mosquitto/config:/mosquitto/config
      - /datadocker/mosquitto/data:/mosquitto/data
      - /datadocker/mosquitto/log:/mosquitto/log
    stdin_open: true
    tty: true
We added the stdin_open and tty lines so we can later connect to the terminal of the container to run some commands.
Note that we also added a dependency on the mosquitto container for our Home Assistant container. This way our broker is online before Home Assistant starts and we can be confident our connection won’t fail.
Create Configuration and Configure Mosquttio MQTT broker
Mosquitto.conf
When we now launch the Mosquitto container using docker-compose up-d the logs will fill with errors about being Unable to open config file /mosquitto/config/mosquitto.conf. To fix this, we can download the default config file and store it in the newly created config directory.
cd /datadocker/mosquitto/config/
sudo wget https://raw.githubusercontent.com/eclipse/mosquitto/master/mosquitto.conf
We’ll make a few changes however. You can add the following lines at the end of the config file as all settings are commented out (default setting) by default.
sudo nano mosquitto.conf
# add the following lines at the end

# Listen on port 1883 on all IPv4 interfaces
listener 1883
socket_domain ipv4
# save the in-memory database to disk
persistence true
persistence_location /mosquitto/data/
# Log to stderr and logfile
log_dest stderr
log_dest file /mosquitto/log/mosquitto.log
# Require authentication
allow_anonymous true
# password_file /mosquitto/config/mqttuser
Note: the configured listener is not secure.
reboot - reboot the Mosquitto container to test your settings
We can now restart the Mosquitto container so it loads our changes.
docker compose restart mosquittoOur log file should show the Mosquitto container has started.
sudo cat /datadocker/mosquitto/log/mosquitto.log
1662413136: mosquitto version 2.0.15 starting
1662413136: Config loaded from /mosquitto/config/mosquitto.conf.
1662413136: Opening ipv4 listen socket on port 1883.
1662413136: mosquitto version 2.0.15 running
Configure MQTT in Home Assistant
We can now connect Home Assistant to our MQTT broker so it can start subscribing to topics and send messages. Since there are no other MQTT clients connected yet, Home Assistant won’t be addin new devices yet.
192.168.2.125 is the static IPv4 of the MQTT broker.
(no username or password required)
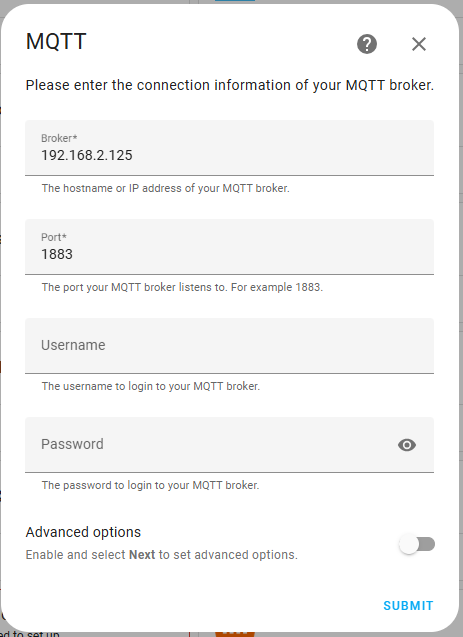
We add a new MQTT integration to Home Assistant . Make sure you enter the IP address of your Docker system.
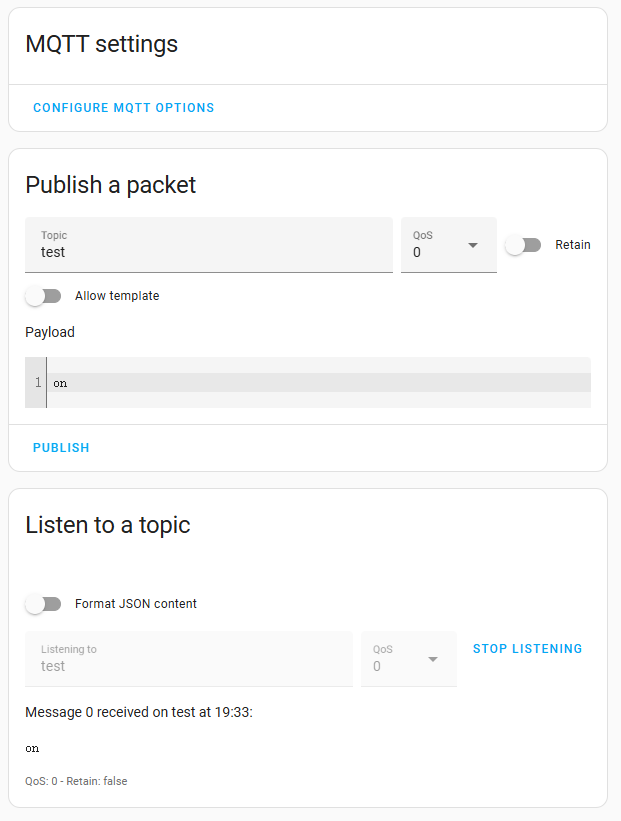
Test Configuration
vist web url:http://192.168.2.125:8123/config/mqtt
Adding security
Network
| Container | Host | Description |
|---|---|---|
| 1883/tcp | 1883 | Normal MQTT |
| 1884/tcp | 1884 | MQTT over WebSocket |
| 8883/tcp | 8883 | Normal MQTT with SSL |
| 8884/tcp | 8884 | MQTT over WebSocket with SSL |
打开命令行终端,执行以下命令拉取Eclipse Mosquitto镜像:
docker pull eclipse-mosquitto
运行Mosquitto容器:
docker run -p 1883:1883 -d eclipse-mosquitto
connect Home Assistant to MQTT broker
cd /datadocker
mkdir /datadocker/mosquitto
mkdir /datadocker/mosquitto/data/
mkdir /datadocker/mosquitto/config/
useful links
https://sequr.be/blog/2022/09/home-assistant-container-part-4-mosquitto-docker-container/
https://portal.habitats.tech/Mosquitto/3.+Mosquitto+-+Setup
https://hometechhacker.com/mqtt-using-docker-and-home-assistant/
https://bbqkees-electronics.nl/wiki/home-automations/home-assistant-configuration.html
Comments
Comments are closed